
Emily and I went shopping for dresses the other day, but she didn’t find much that she liked. I thought I would try sewing some dresses for her, which I haven’t done in a long time (except for Halloween costumes). It’s a long process because I only see her about once a week so I have to wait all week for fittings. Also, Emily doesn’t fit the pattern measurements which are weirdly huge (Emily generally wears a size 2, but the closest pattern size for her is a 10).
I thought of buying a dressmaker’s dummy, but it turns out they cost much more than I am willing to pay. After checking online, I found two different methods of constructing a homemade dressmaker’s dummy — the duct tape method and the plaster method. I decided to do the plaster method — partly because I thought it would have more structural integrity and wouldn’t have to be stuffed with anything, but also because I thought it might be kind of fun to wrap someone up in plaster.
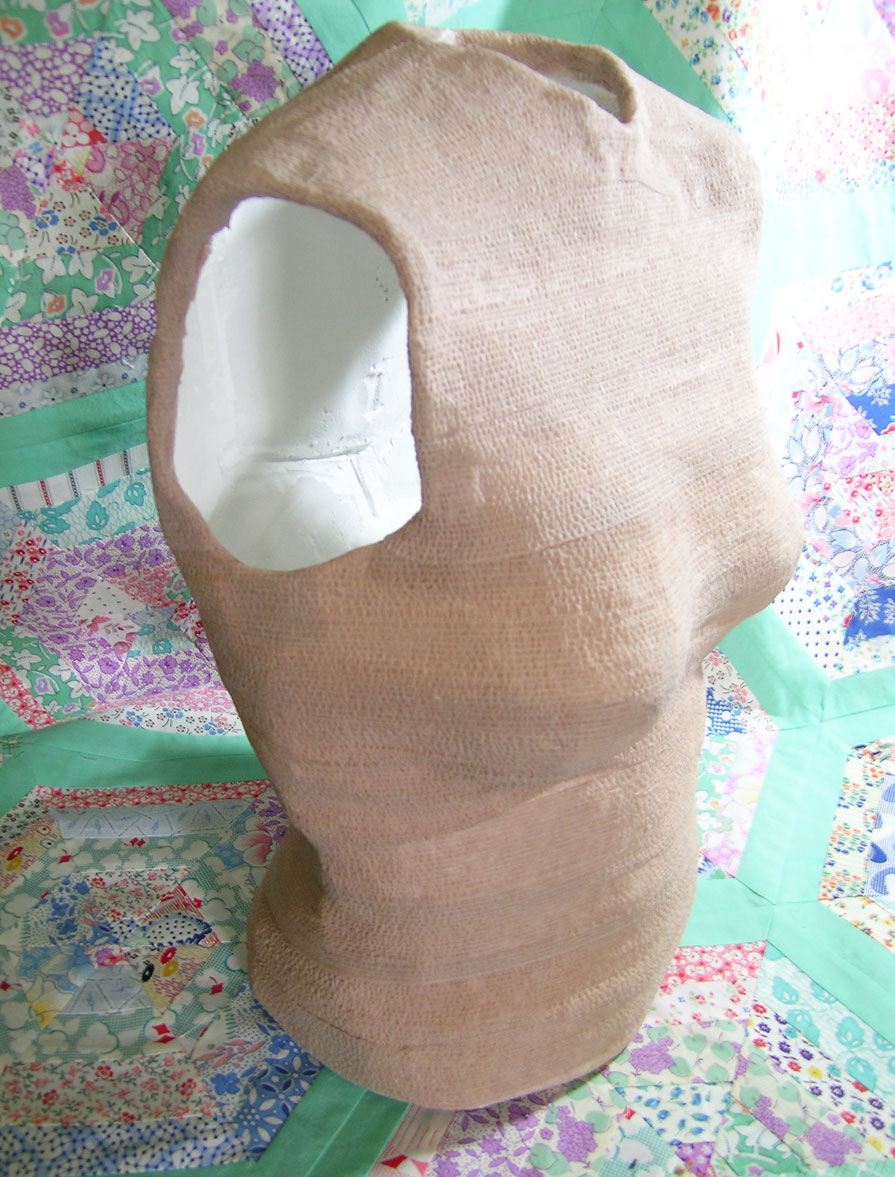
The instructions called for “Rigid Wrap” (sort of a cheesecloth with plaster embedded in it–available at Michael’s) which you dip in warm water and apply just like paper-mache. Emily wore one of her old bras, and we wrapped her stomach with a thin gauze before applying the plaster. It took about 20 minutes to harden enough to cut it off (up the sides and across both shoulders). I had to do a little repair work and then I clamped the two halves together to dry for a couple of days.

And here’s what it looks like after wrapping it in that stretchy athletic tape that sticks to itself. The tape allows you to pin stuff to the dummy. A little spray adhesive will make the first layer of tape stick to the plaster. I’m excited to try it out.

I’m really interested to see how this works for making clothes. I have the same problem, by the way — I wear a 2, but according to pattern measurements I need about a 10, and if I make that it is absolutely gigantic. My sister and I had this problem about 15 years ago when we were bridesmaids for a cousins wedding. They had dresses made by someone there (6 hours from us) and our only fitting was the day before the wedding. My mom measured us and sent them the measurements. When we walked in the door they immediately got all huffy because it was obvious the dresses were not going to fit as they were. Long story short, we had a lot of pins in us while going down the aisle! (And they were SUCH hideous dresses too!)
I have never used a form for my limited sewing. (Generally limited to crafts and clothes for my daughter until she was about 3 yrs old). My Aunt Ruth had one (covered in foil, for reasons I do not know…)that was stored at the end of the upstairs hallway in a large and creaky old house. We have a family story involving my brother, the dress form, a full moon and a scary movie late at night that embarrasses him every time we tell it!
What a brilliant idea!
Thank you so much!!!! I have been thinking of how to do this for a while. The store bought ones don’t cater to larger busts and less “standard” shapes. After all if I was standard I wouldn’t bother with sewing soooo much!!
I am looking forward to doing this. Should be fun with a couple of wines.
What did you use for the stand??
Auckland, New Zealand 11th Feb 2010
I am always excited to visit this blog in the evenings.Please churning hold the contents. It is very entertaining.,
Is there anything you have to do to the skin before you apply the plaster? (like, cover in Vaseline so the plaster doesn’t stick to any hair, or something?)
WOW! This idea is fantastic!! I’d never seen anyone make their own dummy before, but it makes perfect sense!! I sew ALOT (now my friends are trying to get me to be a quilter), mostly hats, sweatshirts, and costumes for a prof. clown. She (the clown) and I are big girls…size 24 and size 26!! Dressmaker’s dummy? Not likely. So far the only one I’ve found that included our sizes was in the UK and it cost over $300!! And that’s not including the shipping!! WAY outta my league!! I guess we’ll just have to follow in your footsteps and make our own!! Thank you soo much for such an awesome idea!! I send you hugs and smiles from Pennsylvania!!
How did you cut the plaster off Emily? And what did you use for a stand? How heavy was the form once it was off Emily?
How much athletic tape did you use?