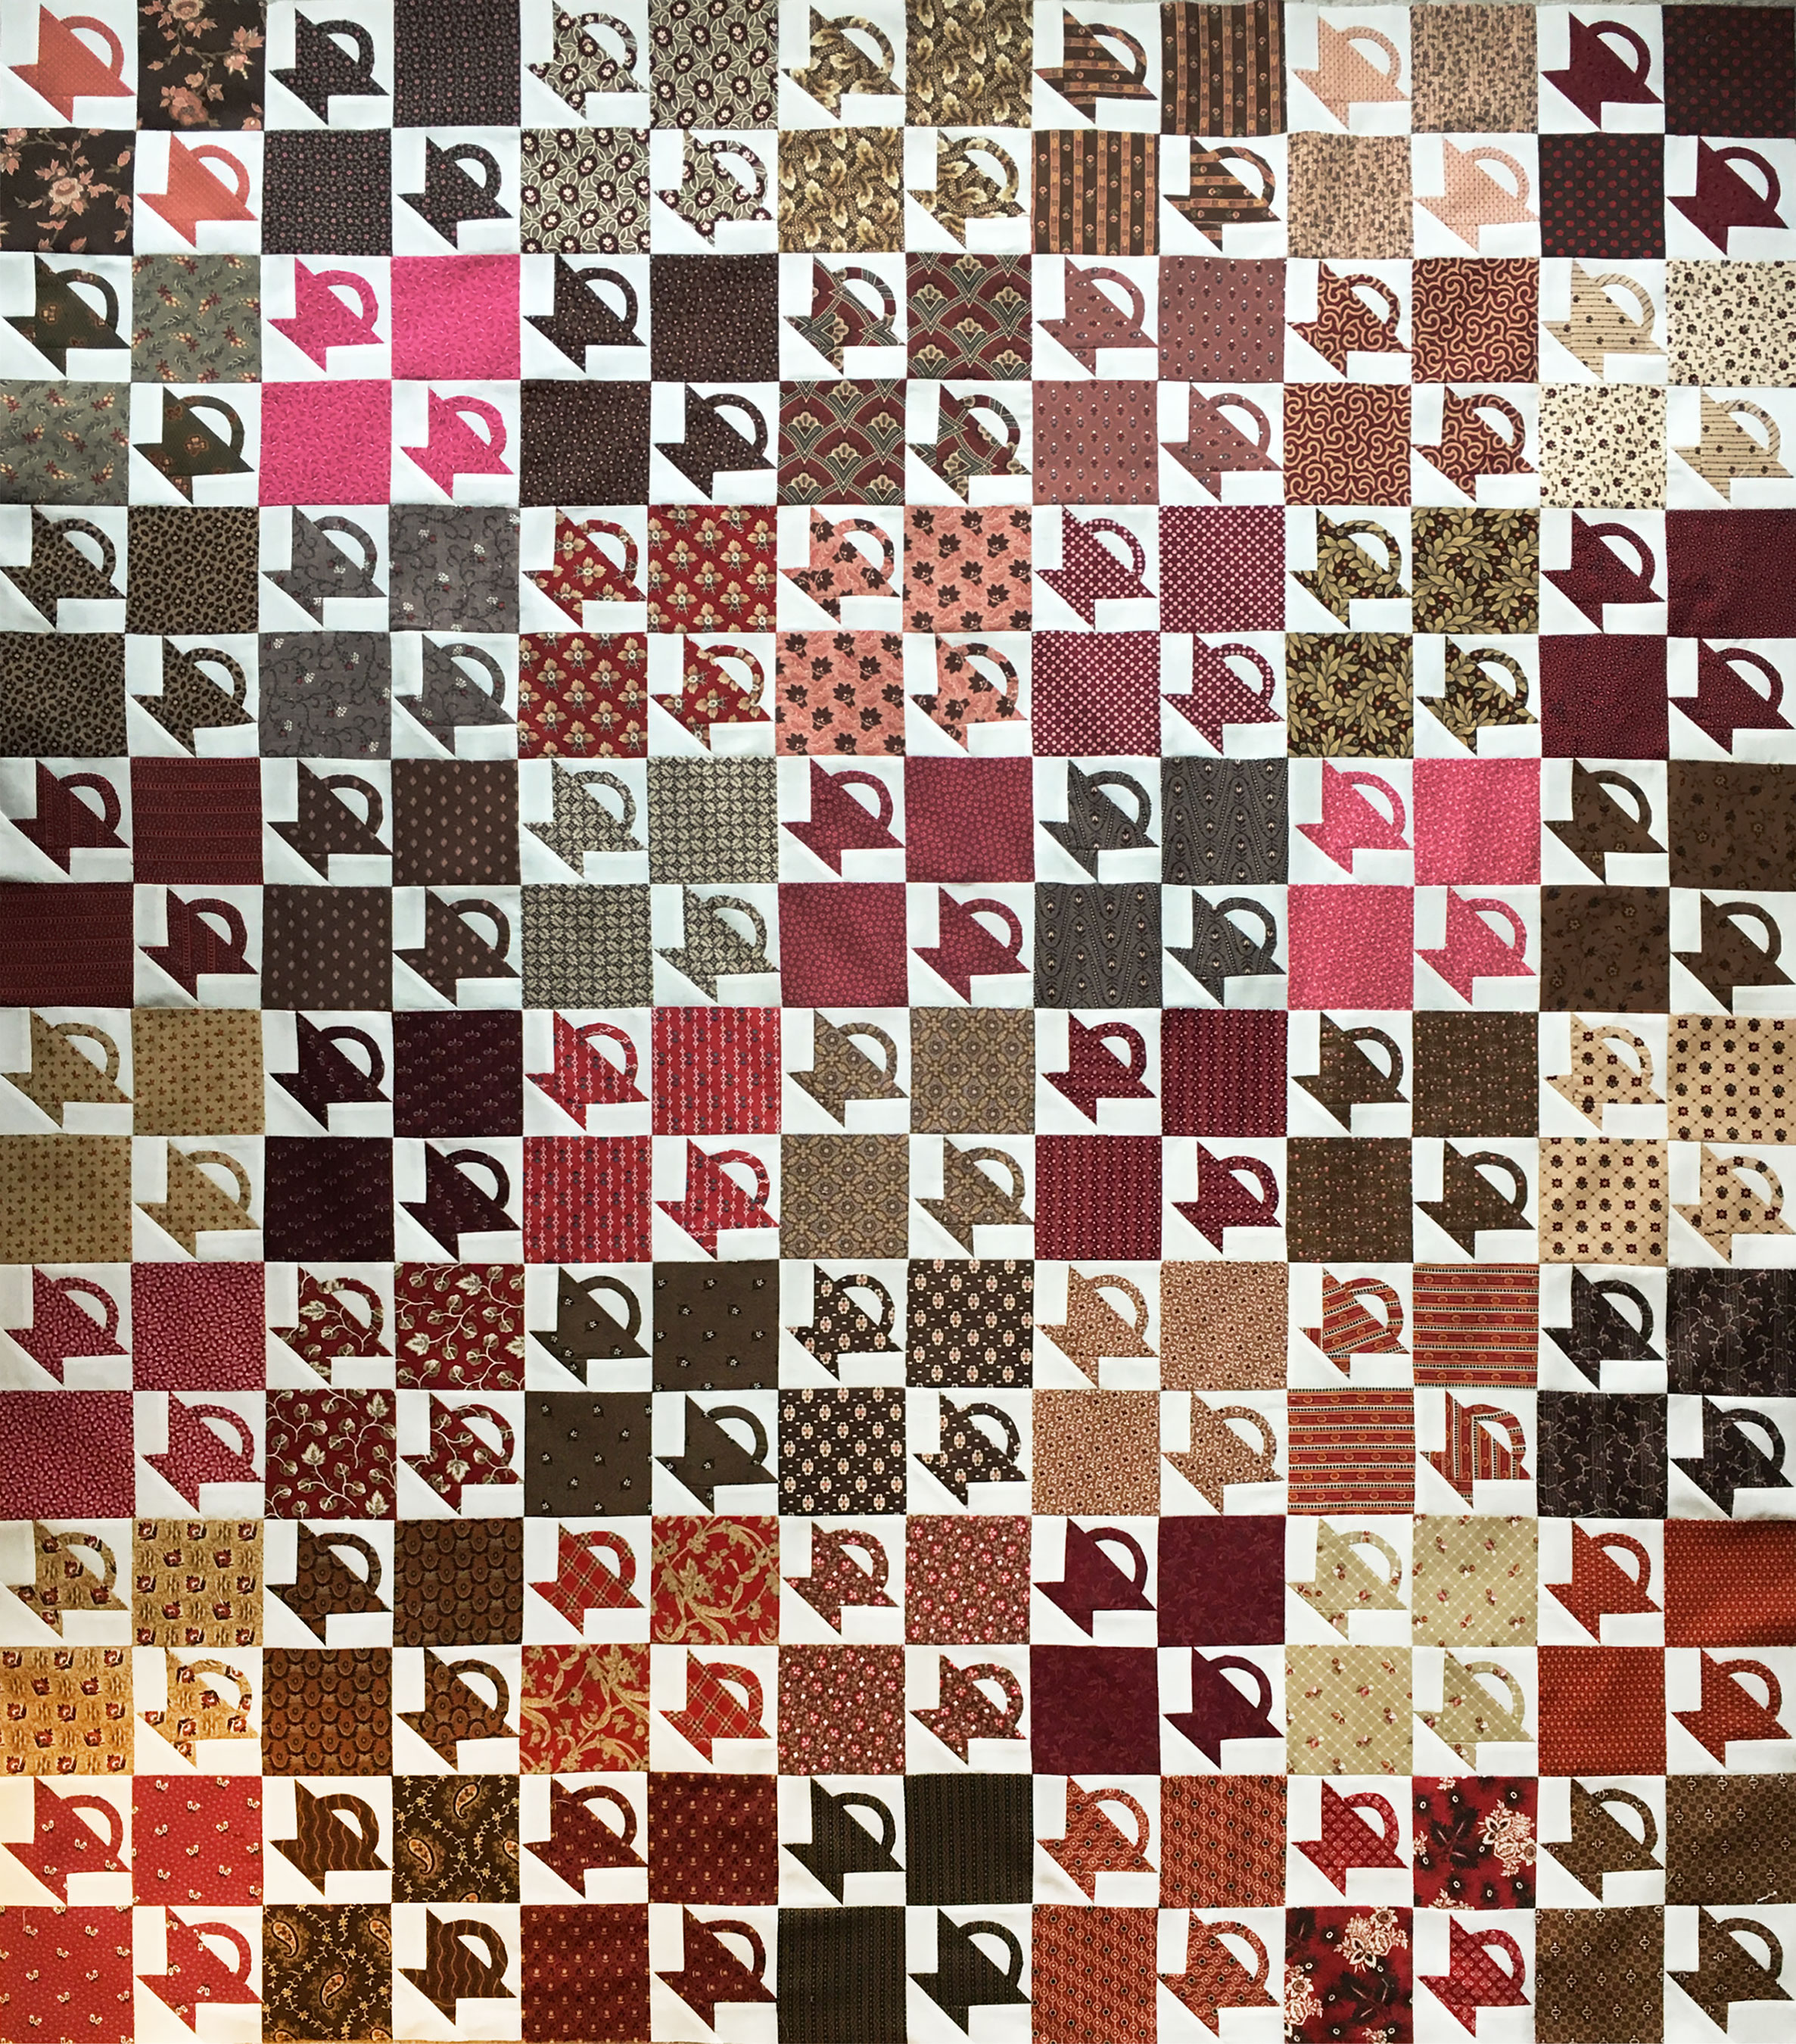
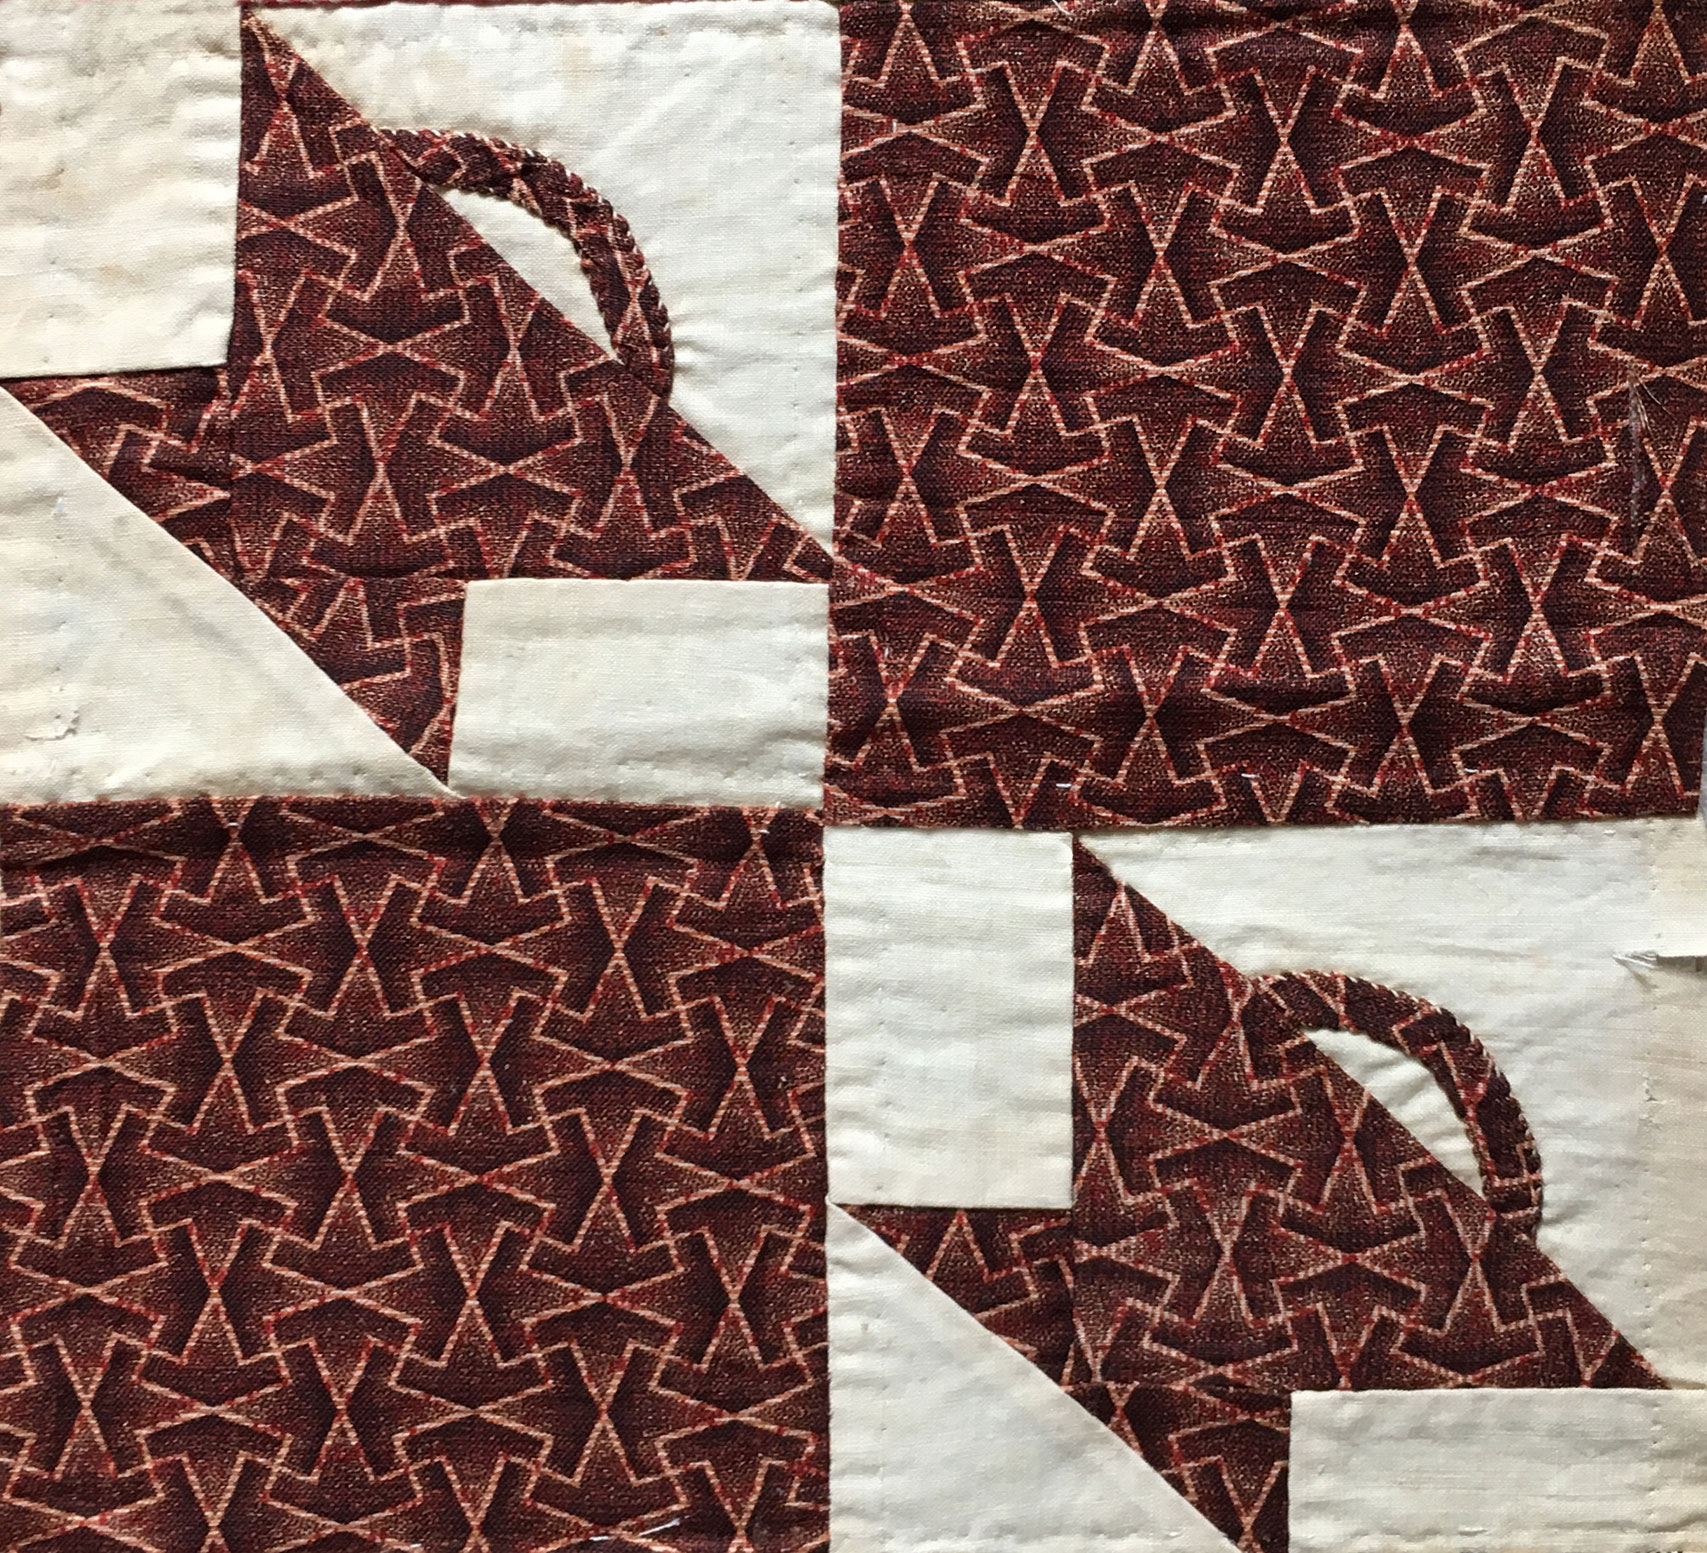
Favorite Paint Book — Little Girls

by Martha in Children's Books

This is one of my very favorite vintage paint/coloring books — I love the subject and the style of the drawings by Mary Alice Stoddard. The best pictures are of boys and girls doing everyday activities — like quilting! Because there are 20 girls and 20 boys, you could make two darling little quilts.

I haven’t decided how I’m going to do this embroidery — redwork would be very cute, but crayon with embroidery would be nice, as well. What I would really like to do is multi-colored embroidery with some appliqued details using vintage fabric.

I am so pleased to finally get these cleaned up to share, and I hope my stitchy friends like them as much as I do.

Cog Wheels Block — Hand Piecing

by Martha in Work in Progress

Some quilters like to make their templates the finished size so they can mark the sewing line on their quilt pieces. I don’t do this — after adding a scant 1/4″ around each template, I draw the cutting line on the fabric and then just eyeball the seam allowance when stitching the pieces together.  Because the blocks Ann selected are complex, I thought they might be nice in just two colors.  Of course, I still want them to be scrappy, so I decided to use vintage indigo fabrics from my stash.  Also, because the suggested sizes were varied on the four blocks and one has way more pieces than the others, I decided to make them all 14″.  It’s probably not necessary to point out that this is a fairly challenging block, and would not be my choice for a first attempt at hand piecing.

When planning how you’re going to put a block together, you want to avoid any sharp curves or inside corners. On this block, I will sew together two basic units (AB and DEFF) and then combine them to make the three colored units you see below. This way I am always sewing a gentle curve when attaching these units to the center C piece. The sewing order will be blue (AB), pink (AB-DEFF) and then green (DEFF-AB-DEFF).

Sew AB (blue unit – make 6)


Sew DEFF (make 6)


Join AB to DEFF (pink unit – make 2)


In hand piecing, you never sew through more than 2 layers.  You get right up against the seam, make a back stitch, pass the needle through the seam, make another back stitch right next to the seam, and then continue sewing.  This is a nice perk to hand piecing — since the seams are never sewn down, they can be pressed in any direction and you don’t have to make a decision about this until the block is completed.


Sew 2 DEFFs to AB (green unit – make 2)

Now, it’s time to put the circle together.  Sew the six units above to the middle C piece, starting with the two blues, then the pinks, and finally the greens.

Finally, join the four corner pieces and stitch them to the circle.

There are several problems with this block that make me unhappy.  First, I meant to attach the 4 corner pieces so the grain in the middle C piece was vertical.  Second, although the points match pretty well, the center circle is not perfectly round (in my opinion, this is the worst problem).  Third, the design is not perfectly aligned vertically.  I hope to do better on the next block.

Ladies Art Quilt Company Pattern #41 – Cog Wheels

by Martha in Quilts

This quilt pattern is the first of four requested by Ann Champion.  Since I still can’t sit for very long, I drafted this on a board while lying on the couch. I’ll tell you what — it’s sort of tricky to use a compass when you’re lying down.  I left some of the extra lines in so you can get an idea of how it’s done.

The pattern sold in the catalog was 19″ — I would probably make it smaller so I wouldn’t have to worry about finding enough vintage scraps for that big petal piece, but I left the resolution fairly high so you could make it any size.  Adjust the size of the block, and print it out (you can do this in sections if your block is too large).  Next, lay your template plastic over the pattern and draw around each piece, adding a seam allowance.

As I was lying here thinking up how to write the hand piecing directions, it dawned on me that I should piece a block myself and take a series of photos. I’ll try to do that this weekend.

Vintage Fabric Gallery – 1930s Blues

by Martha in Vintage Fabric

Thank you for your concern about my stupid injury.  I am moving around a little better now, but still can’t sit or stand for very long.  I did manage to get up and take a few photos today for the vintage fabric gallery.  Although the size of my scraps varies wildly, I decided to take a photo of a similar sized rectangle from each piece for ease in determining the scale of the prints.  If you click on the thumbnails, you will see a 2 1/2″ x 1 1/2″ section of the fabric.  I am partial to blue prints with a little red.

Ladies Art Company Quilt Pattern Book – 1922

by Martha in Vintage Finds

Wednesday night I slipped and fell down our hardwood stairs.  Nothing is broken, but I am kind of a mess and pretty much stuck in bed — for a few days, anyway.  This seemed like a good opportunity to clean up and share this wonderful Ladies Art Quilt Pattern Book which I had scanned earlier.

I count this as one of my best vintage purchases. It came with a $10 lot of quilting ephemera and was a complete surprise. Here is the introduction to the catalog.

PATCHWORK DESIGNS

The following minature diagrams can give but a faint idea of the beauty of these patterns, being here reduced to so small a size the details are imperfectly brought out.  The diagrams, which go with the patterns are printed on heavy cardboard, about ten times the size of the minatures in this book, and are artistically colored, so as to give some idea how the finished blocks would look; being also suggestive of effective colors to use in making up the blocks; tho of course, the combination of colors can be varied indefinitely.  Each design is put up in a numbered envelope and consists of colored cardboard diagram and complete pattern for cutting and piecing the design.

Do not cut this book.  Order patterns by numbers only.  Positively no patterns exchanged.

PRICES.  Pattern with colored cards:  10¢ each; 3 for 25¢; 7 for 50¢; 15 for $1.00,  Color cards without patterns 4¢ each; 25 for 75¢.  Prices under quilt block designs are for finished calico blocks.

PLEASE DO NOT SEND STAMPS.  Send P.O. money orders or silver well wrapped.

Can you imagine….you could buy a completely finished calico block.  I wonder who was sewing these blocks.

This is the beauty of using the template method to mark and cut your pieces — no special instructions needed — just a basic knowledge of geometry and you can draft any of the designs in this pamphlet.  I hope some of you will try this method, and to encourage you, I will begin drafting some of the patterns myself and posting them here.  If anyone has a particular pattern they would like to see, just leave a comment with the pattern number (you can check the name of the pattern on page 2), and I will try my best to include it — once I get out of this bed!


A to Z by Peter Mabie – 1929

by Martha in Children's Books

This is one of the best alphabet books I’ve ever seen — a 1929 Art Deco ABC book by the fabulous Peter Mabie. I don’t own this one (it’s prohibitively expensive), but over the past year I have slowly managed to find photos of the inside pages on library and auction sites. Because I know there are others who would love to see these images in one place, I am posting them here and on Flickr. I’m sorry that a few of the pictures are cut off a bit on the left or right, and I did not include the smaller drawings on the bottom of each page because many of these were missing on my images — they are included on the letter J so you can see how they look in the actual book.

Click on the gallery thumbnail to see the full view.

Now I Lay Me Down To Sleep

by Martha in Embroidery

This is a large mail order transfer dated 1938 from Laura Wheeler Designs (#2266). My copy is in pretty bad shape, with some mouse chews and stains in addition to the usual yellowing. Probably mothers don’t teach this poem to their children anymore because of the whole dying in their sleep thing. Of course, it is followed by the more uplifting third verse (which was new to me) where the child gets to live another day. I still think it’s sweet and I love the little boy with his dog and cat.

The original is a large design (15″ x 20″) and it would probably be a hassle getting the design onto fabric because of the size and all the cross-stitch x’s. A lightened, reversed copy (along with the directions) is also available under my downloads, just in case you want to try it.

Antique Jacob’s Ladder Quilt Top

by Martha in Vintage Finds

This is my latest quilt top purchase. My plan (as usual) was to take this apart to make antique doll quilts, but now that I’ve had a chance to look at it in person, I am almost tempted to remake it in it’s current form. There are many puckers (which really bother me), together with some split seams, poorly matched seams, and a few stains. Although I haven’t examined every print, the fabrics appear to be sturdy. There are some pieces in the top that look very old – the cadet blues, mourning prints and shirtings, but then there’s the pastel and brighter blue prints that look more like 30s prints. It’s obvious from the stitching that the blocks were all constructed by the same quilter, so maybe she just had some older scraps in her stash — like I do. If I were going to remake the top, I might not include the newer fabrics because they just don’t look quite right to me.

This top is both hand and machine sewn, and I don’t know what it is about these very old machine sewn tops — the quilters used unbelievably tiny stitches that are just horrible to remove. I wonder if the stitch length was not adjustable on those early machines, or maybe it was standard practice to sew with 26 stitches in an inch (I am not kidding — I counted them).

I love all the shirtings in this quilt, and most of the prints are a good scale for a miniature quilt. Maybe I could make a Jacob’s Ladder doll quilt, and then I’d feel less guilty about taking it apart.

Cross Variation Doll Quilt

by Martha in Quilts

This quilt top was really a drag to quilt. On a doll quilt, I try to get my quilting stitches as small as possible so they fit the scale of the piece, but it’s hard on a top with this many tiny seams. The same thing happened when I originally quilted the Mariner’s Compass doll quilt, and I was so unhappy with that one, I ripped out all the quilting stitches. Fortunately, I wasn’t nearly that disappointed in this one. Because the quilt is so busy, it’s difficult to see the quilting pattern, so I took a photo of the back which shows the design a little better.

Once again I used a piece of cotton flannel for the batting which I’ve decided works very well for doll quilts. The back is a thin vintage muslin from Belfast Mills, and the binding is an antique double-pink. Usually I have to use some new fabric in my quilts (even doll quilts), but this time everything you can see is very old. I really like that.

Cross Variation Doll Quilt
machine pieced, hand quilted
Martha Dellasega Gray, 2010
20″ x 20″

Vintage Fabric Gallery — 1930s Greens

by Martha in Vintage Fabric

Here are some photos of several of my vintage fabric pieces. I have collected thousands of scraps, small pieces and swatches, and I’d like to document some of these patterns before they get sewn into quilts. If you click on the thumbnails, the enlarged photo represents a rectangle about 2 1/2″ x 1 1/2″. My plan is to photograph the prints and also create a small gallery on my blog every couple of weeks. I hope you enjoy them.